How to Install an Under‑Mattress Cooling System: Step‑by‑Step DIY Guide for Cooler, More Comfortable Sleep
Introduction
One will discover how to transform a standard sleeping surface into a temperature‑regulated oasis by installing an under‑mattress cooling system. The guide explains why temperature control matters for sleep quality, how different technologies operate, and which tools simplify the installation process. Readers will also learn how to avoid common mistakes that can diminish performance or cause damage. By following the instructions, one can achieve a cooler, more comfortable night without relying on expensive air‑conditioning units.
What You’ll Need
- A cooling mattress pad or water‑based cooling system (see product recommendations below).
- Measuring tape, scissors, and a marker for precise placement.
- Elastic sheet fasteners or adjustable straps if the pad does not include built‑in fasteners.
- A small bucket, distilled water, and optional cleaning supplies for water‑circulation models.
- A stable nightstand or floor space for the control unit and power outlet.
Step 1: Prepare the Bed Frame and Mattress
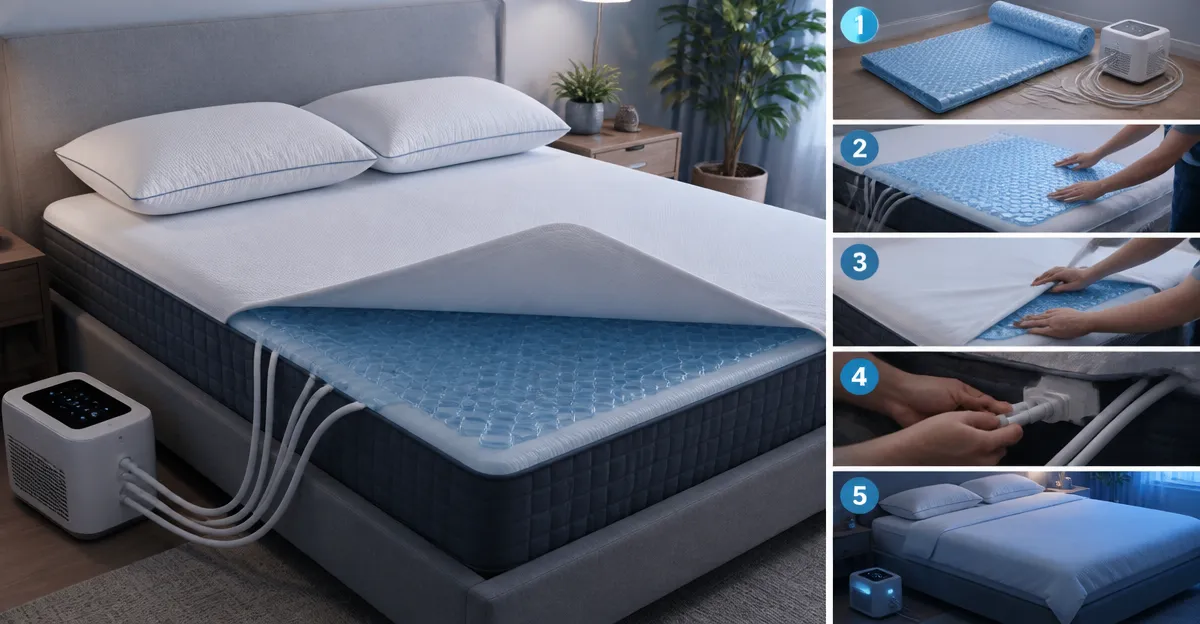
Begin by removing all bedding, pillows, and decorative items from the bed. Measure the mattress length, width, and depth to confirm that the chosen cooling system will fit without excess overhang. If the mattress has a pillow‑top or a particularly high profile, verify that the pad’s elastic edges can accommodate the depth; many products list a maximum depth of 18 inches. Clean the mattress surface with a mild vacuum or lint roller to remove dust that could interfere with the pad’s grip.
For water‑based solutions, ensure that the bed frame provides adequate clearance for the control unit, which typically sits on the floor or a nightstand. A clearance of at least 8 inches prevents the unit from striking the underside of the mattress during use. This preparation step reduces the risk of water leaks or mechanical strain later in the process.
Step 2: Unpack and Inspect the Cooling System
Open the package carefully and lay out all components on a clean surface. Verify that the cooling pad, control unit, tubing, remote control, and any optional accessories are present. Check the pad for any manufacturing defects such as torn seams or missing fasteners; most manufacturers offer a 30‑day return window for damaged items.
When selecting a product, consider the following options. The Elegear Cooling Mattress Pad provides instant cool‑to‑the‑touch comfort without water connections, making it ideal for users who prefer a low‑maintenance solution. The Adamson B10 Bed Cooling System circulates chilled water through silicone tubes, delivering a temperature drop of up to 12°F. The Omni Sleep Water Cooling Mattress Pad combines water circulation with a smart touchscreen remote, while the Sleepme Chilipad Cube offers both cooling and heating functions for year‑round use.
Step 3: Position the Mattress Pad and Secure the Fit
Lay the cooling pad directly on the mattress, aligning the corners with the mattress edges. For pads with deep pockets and elastic edges, such as the Elegear model, press the corners into place until the elastic fully engages. This ensures that the pad will not shift during sleep, which could create cold spots or cause the water tubing to kink.
If the chosen system uses adjustable straps, thread them through the built‑in loops and tighten until the pad rests snugly against the mattress. The Adamson B10 includes elastic bands that run lengthwise; however, reviewers note that supplemental sheet fasteners improve stability, especially for active sleepers. Secure any loose straps with a small screwdriver if the fasteners require a screw‑type closure.
Step 4: Connect the Water Supply and Power (Water‑Based Systems Only)
For water‑circulation pads, locate the inlet and outlet ports on the pad’s side edge. Attach the supplied silicone tubing to the inlet, ensuring a firm push until a click indicates a secure connection. Connect the opposite end of the tubing to the control unit’s water inlet, following the manufacturer’s diagram.
Fill the control unit’s reservoir with distilled water to the indicated fill line. Distilled water prevents mineral buildup that can reduce cooling efficiency. Some users add a small amount of bleach powder as a preventative measure against algae; however, this step is optional and should follow the brand’s guidelines. Plug the control unit into a grounded outlet, making sure the cord does not cross the foot of the bed where it could be tripped.
Step 5: Configure Temperature Settings
Power on the control unit and use the remote or touchscreen to select the desired water flow level. Higher flow rates produce greater cooling but may generate a faint humming sound. Most users find that the lowest or medium setting provides a comfortable balance for warm summer nights.
Set the target temperature using the remote’s numeric keypad or the unit’s dial. The Omni Sleep pad, for example, offers three fan speeds and three water flow levels, allowing precise climate control without a smartphone app. The Sleepme Chilipad Cube provides a broader temperature range (60‑115°F), making it suitable for both cooling and heating scenarios.
Step 6: Test the System and Make Adjustments
Allow the system to run for at least 15 minutes before climbing into bed. Check the pad’s surface for a uniform coolness; any cold patches may indicate a kinked tube or insufficient water flow. Adjust the flow level or reposition the pad if necessary.
Observe the control unit’s indicator lights for error codes; most manufacturers include a troubleshooting guide in the manual. If the unit displays a fault, turn it off, disconnect the power, and reseat the tubing connections. Once the system operates without error, replace the bedding and test a full night’s sleep to confirm comfort.
Tips & Pro Tips
- Wash the Elegear Cooling Mattress Pad before first use to eliminate the factory scent and ensure maximum breathability.
- Place the control unit on a heat‑resistant tray to protect flooring from accidental spills.
- Use a small fan in the bedroom to improve overall air circulation, which enhances the effectiveness of water‑based cooling.
- For couples sharing a bed, consider a dual‑zone system such as the Sleepme Chilipad Cube, which allows independent temperature settings for each side.
- Schedule a monthly cleaning of water reservoirs with a vinegar solution to prevent calcium buildup, especially in hard‑water regions.
Troubleshooting
| Problem | Possible Cause | Solution |
|---|---|---|
| Pad does not feel cool | Water flow set to low or tubing kinked | Increase flow level and straighten tubing. |
| Control unit makes loud noise | Dust in fan or pump | Power off, open unit, clean fan blades with compressed air. |
| Pad slides off mattress | Insufficient elastic grip | Secure with additional sheet fasteners or elastic straps. |
| Water leaks from reservoir | Overfilled reservoir or cracked hose | Drain to recommended level and replace damaged hose. |
Conclusion
The reader now possesses a clear, actionable plan for installing an under‑mattress cooling system that enhances sleep comfort and reduces night sweats. By selecting the appropriate product, preparing the bed, securing the pad, and configuring the temperature controls, one can enjoy a consistently cool sleeping environment. The guide also provides tips and troubleshooting steps to maintain optimal performance over time. Implementing these practices will result in more restorative sleep and increased overall wellbeing.
Products Mentioned in This Guide
Frequently Asked Questions
What tools are required to install an under‑mattress cooling system?
You need a measuring tape, scissors, a marker, elastic sheet fasteners or straps, and for water‑based models a bucket, distilled water, and optional cleaning supplies.
Can I install a cooling mattress pad on any type of bed frame?
Yes, as long as the frame provides a stable surface and enough clearance for the control unit and power outlet.
How do I ensure proper placement of the cooling pad?
Measure the mattress dimensions, mark the corners, and align the pad so the cooling channels cover the full sleeping surface.
Do water‑circulation cooling systems require regular maintenance?
They need occasional refilling with distilled water and cleaning to prevent algae or mineral buildup.
Will an under‑mattress cooling system affect my mattress warranty?
Most manufacturers state that using a compatible cooling pad does not void the warranty, but check your mattress warranty terms first.